Combining Craft Techniques (Part III)
 I'm going to refer back to one of my earlier projects and explain the process I went through to achieve the results. It started out here: Saved From The Heap...
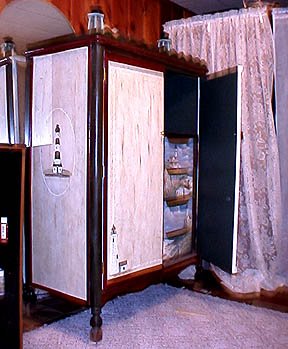
As you can see from this picture, I used several craft techniques to achieve the end result.....all without being an artist!
Once the cabinet had been revamped and a white primer coat applied (inside and out), the next step was to pick the colors that I found pleasing and a "theme".
Since I had purchased the lighthouse prints on sale at 75% off at a craft store, I went with that theme. I decoupaged the images onto the drawer fronts (after repairing them). I happen to like the deeper tones in paint...so I sketched (kindergarten level, mind you) the cabinet on a piece of paper, and used colored pencils that best matched the colors that I liked, to play with where the different darker paint colors were going to be placed on the cabinet. Now this may take you a couple times of "coloring", but it's well worth it and can easily be done while you're watching your favorite TV program.
The main paint job on the sides and the doors, was sponged on with a cream colored paint
I needed some way to coordinate the outside of the cabinet with the inside....and it was obvious that I should put lighthouses on the outside also. Again....no artistic talent....so I went to my computer and printed off an oval for the sides of the cabinet. I had to play with this a little to get the correct size....cut the oval out, taped it to the craft cabinet, and traced around it.
Once the oval was traced on....back to the computer to print off a lighthouse image to fit in the oval. Once I had one that was the right size, I used tracing paper over top of it to get the basic image (remember if you're using this method to print it in reverse). I centered the tracing paper image onto the oval, and again (using a pencil), traced over the image. The lead from your pencil that is on the tracing paper will appear on your project when you re-trace it in this manner (if that's not too clear...let me know, I'll try to explain it further). Now it's just a matter of using your acrylic paints and artist brushes to paint it in and add any embellishments you might want such as smudges with the brush for sand and grass/weeds.
I used the same procedure to paint the lighthouses on the front doors of the craft cabinet, just a smaller size.
It still seemed like there was something else that was needed....so I stenciled a "rope" border around the edges of the doors and the sides in white.
Once I had these steps done....it just seemed too bright to me....so let's add something to tone down the colors a little bit. I wiped a watered down white acrylic paint using a sea sponge and once that was dried, I then used the same process, but this time using a Burnt Umber on all of it except the areas that had the lighthouse images (excluding the ovals).
My last process was to use an acrylic paint pen and outline the ovals in white to make them "pop"!
Finally complete! So, how many processes did I combine? Painting, sponging, color washing, computer imaging, tracing, antiquing (that's the Burnt Umber), decoupaging.....and let's not forget carpentry to originally put everything back together!
Quite a bit of work, grant you, but well worth it to me for the end results!
If you can only but see the possibilities of what something CAN be after you put your creative crafting techinque to it, you will be amazed at what you won't throw out!!
posted by J. Martin @ Monday, February 13, 2006
![]()
![]()

0 Comments:
Post a Comment
<< Home