Recycled Chest
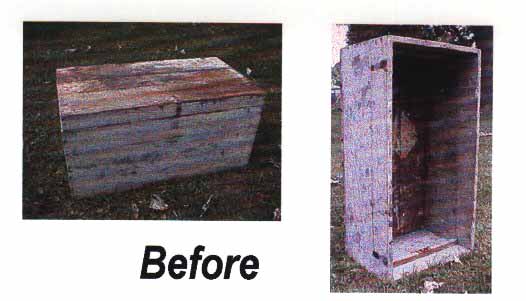 Another item from the outdoor market. Pretty awful, huh? But the wood is solid. I just wish that they had left the hinges!
Now this one is going to take some work to fix, don't ya think?
It really wasn't too bad. A little scrubbing and washing with some TSP (you can find that at your hardware store), please use gloves for this process. And don't ask me to tell you what the letters stand for.....I can't pronounce it anyway. All I know is if you need some heavy duty cleaning done, that's the product you use. It comes in powder form and you just mix it with water.
I should have taken an after picture of when I was done cleaning it just so you could see the difference....but I didn't! It really did clean up rather well. Most of that black gook you see in the bottom of the box, was just that "gook". I think it was used as a tool box at one time.
But I think my elbow grease paid off:
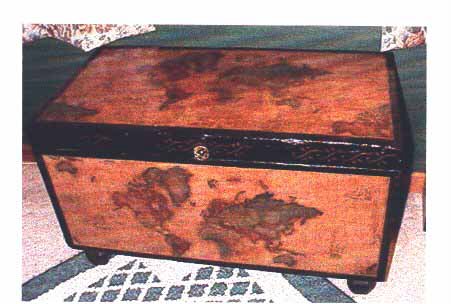
Once I had cleaned it...I gave it a good couple of coats of primer. After that was dry, I added feet (fence finials) to the bottom to raise it off the floor a little, and painted everything black.....(well, I actually painted it gray, didn't like the color and repainted it black....the beauty of paint....you don't like it, just repaint it!).
Now the map design on it was created from wall paper. (I should have just said I painted it that way....nah....we all know I'm not that talented). I actually got the paper free....it was being thrown out! When I actually adhered it to the chest, it was a much brighter color than what appears in the picture. To tone it down and make it look aged, I went over it with watered down Burnt Umber acrylic paint. You might have to do this a couple of times to get the affect you like. In this case I used two coats of the watered down paint (let dry in between coats....I would suggest a couple of hours).
I would suggest that if you're going to use wallpaper on a project/piece of furniture....I would use another adhesive besides just what's on the wallpaper, just to make sure it doesn't lift after it's been on there for a while. Watered down Elmer's Glue All (1 part glue to 2 parts water) will work just fine. Make sure you get all air bubbles out.
When this was all dry, I applied two coats of polyurethane, added some handles to the sides and hinges to the lid (second hand/yard sale finds), and I had a nice storage chest for my living room. Not only is it great for putting books, blankets, and other things in, it also can serve as extra seating. An additional plus is since I didn't pay a great deal of money for it, I don't worry about people/kids possibly messing it up setting things on it, climbing on it, etc!
Now....would you have picked up this wood box if you had seen it at the outdoor market? Or would you have passed it by?
I still have one further step that I will do on this project and that is to put a "flat" finish on it in keeping with the aged look. At the time, I only had the semi-gloss poly and wanted to get it done!
posted by J. Martin @ Friday, February 03, 2006
![]()
![]()

0 Comments:
Post a Comment
<< Home