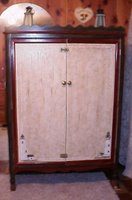
Saved From The Heap....(Craft Project 2)
 I came across this object (actually, a friend of mine was throwing it to the curbside and asked if I wanted it). Her view of it was "A piece of junk". My view, "Wow....that would make a nice cabinet to house my craft supplies!". It took a bit of work, admittedly, some from a carpenter friend of mine (the same friend's husband), but it really turned out quite unique!
I had to replace the doors (that's where the carpenter friend came in....although, I believe I could have tackled that myself, it would have just taken me more time since I'm not yet real handy with my circular saw). One of the drawer fronts was broken....I nailed and glued that myself. It didn't have a back on it....I had an old piece of "wood" paneling in my garage that I cut to size to fit the back. The top of the wardrobe had the veneer peeling off....sanded it as best I could, added another piece of "one side good" piece of plywood (found at curbside) to that....and then the whole thing just had to be refinished/repainted.
Well, here's how it looks now.....


I also drew some lighthouses on each side that really turned out nice.....just don't have a photo of it.
And, as you can see, I also put in shelfs on the side that normally would house hanging clothes. The shelfs were made from some kitchen cabinet doors that had been disposed of (another curbside find) and were solid wood. The images on the drawers were small prints I found on sale that I decoupaged onto the drawer fronts. I learned a valuable lesson from that also: if you are using a heavier paper to decoupage onto an object....soak the paper first in water for a few minutes before applying (it won't hurt the image). Your paper will be more pliable and breathable, allowing you to get the air bubbles out and have the whole thing lie flatter on your object. Although I only had a few air bubbles....it took numerous coats of decoupage glue to make it to where they do not show....wet sanding the glue about every two to three coats.
All in all.....it now houses all of my craft paints, brushes, stamps, tapes, stencils (well....most of them anyways ;o) !).
So, you see, with a little imagination and just keeping your eye out for those "finds and supplies", something that would normally go into a landfill, can really become one of your most prized possessions!

0 Comments:
Post a Comment
<< Home