Combining Craft Techniques.
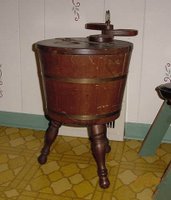
 Here, I will show you how I used a few different techniques to make this little old sewing chest look better than it probably has for quite some years.
As you can see, it has many dings and dents! This is a small item, so therefore, you can decorate it to fit in just about any area of your home. It makes a nice little extra storage area for magazines, books, remotes, plant stand....you name it!
This was orginially bought at a yard sale for $2.50....still pretty solid....but needed cleaning (inside and out). For this, I just used soap and water, being sure to dry the piece as you go so that no water is left sitting on it to distort the wood.
This is how it looks now:
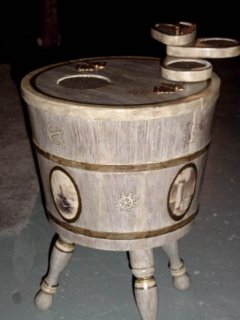
 After cleaning the little cabinet, I dry brushed it with some leftover cream colored latex paint. That's a process of just dipping the tip of your paint brush in the paint, wiping the brush on a rag or piece of paper towel so that there is very little paint left on the brush, and then lighly brushing your object with what is left on the brush, so the wood grain/stain still shows through the paint.
If you are not pleased with the first application, after having done the whole object....just do it again....it takes very little time to paint in this manner. When the paint was completely dried, I then decoupaged some small images around the sides of the sewing chest, and applied two or three coats of the decoupage glue over the tops of the images, wet sanding after the glue dried, to smooth it out.
Now it's time to get out your stamps (not postage stamps)! Using two little stamps, and the same paint, I stamped in between the images I had decoupaged and around the top border. Once that was dried....I used a permanent marker to outline the stamped images to make them a little more prominent. I outlined the decoupaged images the same way.
Now use your little artist brushes to add any other little embellishments....such as was done on the spindle legs.
To add an aged look...I took a little burnt umber acrylic paint on a sponge and sparingly wiped it over the whole project. (You're almost done!!)
Once this had dried thoroughly....two coats of polyurethane...and you're done!
I did this project as a gift for a family member. It now resides in their bathroom, which is done in a nautical theme, as a magazine/extra toilet paper holder.
So with just a small item and some imagination....save the landfill and give something personal (not to mention, saving on your pocketbook). This world will be a better place if you do!

0 Comments:
Post a Comment
<< Home