HOW TO Be An Artist When You're Not!

I've touched on this a little bit in my past posts....my not being an artist and being able to just do wonderful paintings on a craft project! But that doesn't mean you can't do some wonderful things to your projects....it's just going to take you longer!
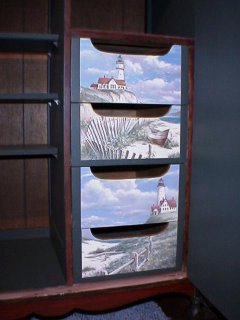
One of my favorite techniques for creating a nice finished project without having the artistic painting ability, is to "decoupage" an image that I like onto a piece of furniture....thereby saving me from making it look like a kindergarten project (although some people like that affect also).
I'm usually very careful about the images I use do to copyrights, but you can use a lot of clickart images (as long as your not mass producing and selling for a profit without their permission). I've taken posters that I've bought (at a discount of course), and decoupaged them onto furniture pieces. The above cabinet was pictured in one of my other posts.....Save From The Heap.....but this is the inside view with the decoupaged drawer fronts.
Regular images you print off of your computer, unless it is a laser printer, should be taken to a copy place, and a copy of it should be used. If you use the image off of a regular inkjet printer, once you spread your glue over top of it, the image colors can change quite drastically (been there - done that!).
The basic steps for decoupaging:
Choose your image (if printing from an inkjet printer....get a copy from your local copy shop).
Cut out your image (remove any excess paper you don't want).
Using a foam brush....brush white glue on the reverse side of the image. (Please note that I generally use Mod Podge....but it's my understanding....you can also use watered down white glue.)
Place your image on the surface you're affixing it to, gently manipulate it into position, and make work out any air bubbles that might be under it. You can use want they call a brayer (small wood roller....looks like a paint roller...only wood), to smooth it out.
I usually will let this dry before proceeding (usually about 20-30 minutes).
Once this has dried....apply a coat of your white glue over top your image....don't worry about going "outside the lines" of your image...just don't put on too heavy a coat of glue.
Let this coat dry....(you'll know when it's dry....turns from a milky color to clear).
Then you want to put on a third coat....and let it dry.
Once you're third coat has dried....you'll notice that at this point (or before), that it doesn't look too smooth...don't worry...because now you're going to take some "wet finishing sandpaper" and smooth all that out.
You can buy "wet sandpaper" at any hardware or department store. Take your sandpaper and immerse it in warm water for 2-3 minutes...I usually start with half a sheet....fold it to fit your hand....and going in small circular motions, start rubbing where you've glued your image. This "re-wets" your glue so that you are able to smooth out any lines in it from your foam brush. Do not overwork it or you'll end up messing up your image! Once you've smoothed out the glue.....again, let it dry (you'll notice the swirls you made...but only 'til it's dry). Depending on the size of your image that you're gluing....you might have to re-wet your sandpaper a couple of times.
Now apply three more coats of glue and repeat the process.
From this point, you can either decide whether you need to apply more glue or whether you want to apply a couple of coats of polyurethane and be done!
What determines if you apply more coats? If after you first applied your image....and not all the air bubbles disappeared....or a part of it "wrinkled" a little....the more coats of glue you put on and then smooth out...the more your air bubble or wrinkle...will disappear!
IF you are going to use a poster image....it's a whole different technique due to the thickness of the paper.
First, you will want to immerse your poster in water (use the bathtub if necessary for larger images). Let it soak in the water for about 5 minutes (it will not hurt the image).
Paint your glue onto the object that you're going to be applying the image....and then apply your wet image. Again being careful to work out any air bubbles. You are going to need to let this dry for a couple of days. Once dry....I would just use a clear acrylic spray sealer (a couple of coats) to protect it and make it so that you're able to wipe it clean.
So find an image you like.....and do something with it!
One final thing......here is a site that is all about decoupage and can answer many of your questions and give you resolutions to many of the problems you may encounter when decoupaging:
The Artful Crafter

0 Comments:
Post a Comment
<< Home